Tampilkan postingan dengan label lapstrake. Tampilkan semua postingan

Jumat, 22 Juli 2016

Fine Lines and Lapstrake Clinker Hulls

I was having a discussion recently with one of my sons about which hobby activity was the most fun. We have far too many hobbies, but flying and sailing are close to the top. Well, we both decided that there was no contest - dinghy sailing came out as number one.

Where I live, the biggest problem with sailing is exposure to the savage sun, but running a close second is being continually doused by water as you drive to windward. Yes, I know that we have a nice climate on the east coast of Australia (at least as far north as we are), but for a large part of the year the water is frequently very cold when it hits a hot body!

Most of the boats that I have sailed have had relatively blunt forward sections, and they tend to bash water into the air when butting into a wave, and the wind blows it back directly over the crew.

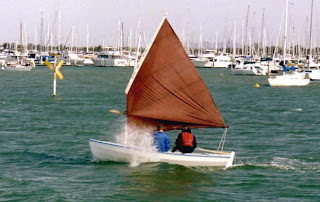
Hard to windward with a deep reef tied in - relatively smooth water as we exit the harbour, but we are still getting wet!
There are plenty of advantages in having full sections forward, such as adequate buoyancy when running down waves, and the ability to move forward in the boat while still retaining reasonable trim. In some boats where load-carrying is critical, a very broad bow is essential - for example a praam dinghy

My Alby design - lots of carrying capacity in a short hull
The problem is that the disturbed water pushed up by a blunt boat - at least in a dinghy - consumes power, and as previously mentioned, bashes water up into the wind so that it can wet the crew efficiently.

This is a nice design I built a few years back, but you can see that she pushes up a lot of water, even in light conditions

Here is another good example - a really nice design, but pushing up lots of water.
In both of the above photos, the boats were drawn by exceptionally good designers, and the shape ended up the way it did for important reasons. But it does demonstrate the point Im making about the water.

When I was asked to design Phoenix III, I really wanted to keep the bow fine. In fact, it has become a bit of an obsession with me, although I do change my attitude when necessary (e.g. Alby and Whimbrel).

Phoenix III showing her fine forward sections
My reasons for going down the path of fine forward sections include: -
  • Dryness when pushing to windward;
  • Reduced pounding - something which is very important in a small and light-weight boat;
  • Easily driven hull - particularly when under oars
Paul Hernes in his Phoenix III under oars - he is too busy smiling, and should be rowing faster!
One of my favourite methods of construction is glued-lapstrake (or glued-clinker). This system is only possible if the planks are made of plywood, because natural timber planks lack cross-grain strength and will crack where the thickness of the planks changes from double to single. That is why traditional clinker hulls have lots of closely-spaced bent ribs, and have their plank laps riveted or clench-nailed - the ribs provide cross-grain strength, and the mechanical fastenings allow the planks to move relative to each other as the boat shrinks and swells in changing conditions. Plywood has almost equal strength in all directions, and can be glued at the lap - this produces a strong, stress-skin hull which requires few, if any, internal frames. The glued laps form an integral "stringer" which further strengthens the hull.


A clean and open interior

A wonderful side-effect of the lapstrake construction method is that the laps produce a series of "spray rails" on the external surface of the hull.

Fine forward sections and prominent laps on my Periwinkle design
The combination of the fine lines and the overlapping planks makes for a dry ride in most conditions.

Here is a good example of the effectiveness of the sharp forward lines and the "spray rail" action of the laps. This is another photo of Periwinkle.
As with all things, there are drawbacks. Any boat with fine lines forward (or aft for that matter) needs to be properly trimmed, as they are sensitive to weight distribution.

Here, the crew of Periwinkle is a little too far forward for the conditions. In gentle winds their position would be ok, but I think the big mainsail was driving her down somewhat at the bow. However, she is still going nicely!
Every boat is a compromise, and there is a place for all different sorts of hull shapes. The more more you understand about hull-forms and construction methods, the easier it will be to make a decision about what is right for your circumstances.
Read More..

Kamis, 23 Juni 2016

Glued Lapstrake Clinker Another Approach

Trailer and car-top boats are my specialty for a number of reasons - the primary one being that I dont have the resources to live near a deep water anchorage and so carvel-built boats kept on a mooring are beyond my means. 

Tom Dudgeon moored in very shallow water.
(illustration taken from Coot Club by Arthur Ransome)

But in many ways this state-of-affairs has turned out to be to my advantage. Large and deep boats are unable to visit the hundreds of thousands of superb shallow water destinations which abound along the coasts of most countries, and a cruise in a large boat can mean being imprisoned in a cabin or on a deck which is in constant motion while the crew view the exciting coastline from a long distance out. Every bar-crossing is a stressful event and very few nights on a cruise provide real rest because of the responsibilities of anchor watch.

On the other hand the dinghy cruiser can work up tiny creeks, cross bars where a mishap simply means stepping into ankle-deep water and pushing the boat across the obstacle into the calm on the other side of the bar. Some of the most enjoyable cruising Ive done (all in dinghies - sail and power) has included sessions of travel along the coastline with the boat just outside the shore break. This is most exciting and enjoyable stuff, providing close-up views of beach, rocky headlands, mangrove creeks, breaking reefs, entrances to bays which are invisible to the crew of boats further offshore etc. Sailing, poling or rowing across flats covered by two feet of water is challenging and deeply satisfying. The options available to the beach-cruiser are manifold....

Alec Morgans camp ashore on an island in Moreton Bay during a solo beach-cruising expedition. The trip was of about five days duration, and involved a whole range of coastal activities including exits and entries across surf bars.
I still suffer from a desire to spend nights aboard bigger boats, snug inside a cabin surrounded by sounds of the sea, listening to rain drumming on the deck. However, my wife, who has actually cruised and lived aboard larger boats for approaching nine years full-time, has told me the dream is frequently better than the reality. For her, cruising in a centreboard dinghy for the first time was a true and enjoyable revelation.

Anyway, Ive found myself spending a life involving small trailer boats, and I still get excited every time I head out (and in when Im tired/cold/hot/scared/hungry/sun burnt/hypothermic....)

Graham Faulkners Periwinkle in the beach slop
Son David and me approaching the shore after a very wet and cold sail  - heavily reefed and going like a rocket.
An extremely important element in successful beach-cruising is light gear, and light-weight boats. It is no fun not being able to haul a boat up past the high-water mark, and even worse being unable to get a boat back down the beach to the water. Also, late middle-age has taught me that manoeuvring a trailer around the yard by hand has become more difficult than it was.....

Launching the Francois Vivier Aber I built for Dr. Paul Truscott. She is quite a large boat for her length, but the entire package can be wheeled around on land on her trailer by a single person with relative ease. As you can see, launching and retrieval are a breeze, without even having to immerse the trailer wheel bearings.
Very light-weight hulls can be built using cold-molding techniques, foam-cored construction and glued-strip planking, but all of these methods are fairly complex and/or expensive. My choice of methods for light-weight, inexpensive, quick, and simple construction include stitch-and-glue plywood and glued-lapstrake (clinker) plywood.

Periwinkle under construction using glued-lapstrake techniques.  Most of the weight in the internal structure gets left on the mold strongback.
Will Shrapnels boat being built using the stitch-and-glue method. This is my Fleet design  - a very light boat.
Recently I was commissioned to build an Annapolis Wherry Tandem from a Chesapeake Light Craft design. I was interested in building this boat having previously read about the patented "Lap-Stitch" method devised by Chris Kulczycki. "Lap Stitch" is a trade mark, but I cant make this program insert the symbol!


Cover shots from Chris Kulczyckis book The Canoe Shop in which I first read about the "Lap-Stitch" construction method. That is John Harris, owner of Chesapeake Light Craft, in the paddling photo.
"Lap-Stitch" combines the advantages of both glued-lapstrake and stitch-and-glue construction methods, meaning that a shapely glued-lapstrake hull can be constructed without having to use a strongback and station mold set-up, saving time and making the somewhat intimidating glued-lapstrake construction method accessible to inexperienced builders. What makes this possible is that the overlapping planks have a rebate machined into one edge instead of needing a varying bevel planed along the edge(s) - something which worries many beginners. The key, though, is not that the beveling operation is avoided, but that the inner edge of the rebate "hooks" onto the edge of the preceding plank allowing properly developed planks to be stitched together in a manner very similar to that used in normal stitch-and-glue.

A drawing I did to illustrate the difference between Glued-lapstrake and "Lap-Stitch"
Any true stitch-and-glue design relies on extremely accurate panel development and panel cutting in order to have the hull adopt the correct three-dimensional shape, and the same remains true for "Lap-Stitch". Once the hull has been stitched together, it is positioned upside-down and relatively low-viscosity epoxy is run into the open lap rebate and allowed to set. Not only does the technique require the accurate panel development and a defined rebate, but it also needs an adhesive which is truly gap-filling in a structural sense - and the adhesive must be runny enough to work into the gaps under gravity - but not so thin that it runs all the way through to drain out on the inside! As far as I can see, only epoxy is practical for this, and it must not have much of the glue thickening additive included in the mix.

This is the only photo I have which shows the rebate machined along the edge of a plank.  Here I am cutting through one of the tabs holding the plank into the plywood sheet after the shapes have been cut with a CNC router. You can see the routed rebate under where my left hand is gripping the plywood.

Annapolis Wherry Tandem during the initial stitching-up process
Plenty of stitches required. I elected to use plastic cable-ties instead of the  copper wire  recommended by the manufacturer of the kit. I find the cable-ties are less likely to damage the soft plywood, and are easier to tighten and to remove. You can just make out the "jigsaw puzzle" joints used to join the planks longitudinally. I will have more to say about these in a coming post, but in the meantime Ill be using scarph joints on my boats.
Here you can see the stitches on the inside of the hull.
In this photo you can see where I have run the epoxy into the gaps of the plank laps. I am fastidious about  gluing-surface preparation, and I took exceptional care to get the epoxy into the gaps to the maximum extent. Although I used a hypodermic syringe without a needle to run in the epoxy, the process was messy and slow. At this stage the epoxy had cured and I had removed the ties holding the laps. The remaining ties are the ones holding frames and bulkheads in position.
This is a section through one of the plank laps at the transom, showing the rebate, the initial low-viscosity epoxy which I worked into the seams with great care, and then above that the more thickened epoxy which I used to completely fill the seam.  To be done properly, the job requires great care and attention to detail.
I dont have any suitable photos, but this drawing shows a section through a conventional  glued-lapstrake hull showing the beveled laps with parallel-sided glue lines.
200gsm (6oz) woven glass set in epoxy over the flat bottom panel and the first two planks on each side of the Annapolis Wherry Tandem. The wide white lines are epoxy fillets used to fill out the internal plan laps so that the glass cloth will lay fair.
External glass cloth over the bottom panel and the first plank (garboard strake) on each side. The internal and external glass shown is as per instructions.
Recent photo showing external paint nearing completion

A long and lean boat - awaiting final internal sanding and painting

Well, that is a brief run-down on "Lap-Stitch". I think it has a place for some people - especially beginners. However, like all boat-building methods, it does require serious attention to detail, and should not be taken lightly. For myself, Ill stick to the normal method using a station mold and strongback, as I like the tighter glue-lines and neater work. My opinion is that I could have built the strongback, mold and the boat using conventional methods faster than by going through the messy gluing process and filling of hole associated with the "Lap-Stitch" system. But that is just my own opinion, and I can see a real place for "lap-Stitch" as long as the plank patterns are accurately deigned and cut, and that the person doing the work is happy with relatively heavy epoxy use in comparison with conventional glued-lapstrake. Id say the building process is more simple for a tyro than the conventional method, but not any faster.
Read More..

Rabu, 15 Juni 2016

Lapstrake Planking cutting a rolling bevel

I recently received an email from Patricia Hong, asking for some clarification on the system I use for cutting plank bevels when building lapstrake (clinker).  I thought the email and my reply (attached to the original in red to save time - we were still in flood-recovery mode) might be of interest to others. Here it is, along with some illustrations for clarity.

?
?
That is me, cutting a plank bevel on the first Periwinkle
? ? 1 :  Is this plane just drilled and a threaded rod put through the body of the plane ? I just drilled one of my low-angle block planes (on a cheap drill press) to accept a piece of brass rod which I had on hand. The rod is a neat fit in the hole, and can slide through to project any length I want, on either side of the plane.

2 :  Does the rod align flat  with the bottom / bed of the plane ? The bottom of the hole (and the bottom of the rod) are 11mm above the bed of the plane. I did this because I had access to cheap pine square-section moldings from the local hardware store which were 11mm x 11mm, and I used these as battens. See answer to next question. 

3 :  The guide / rod appears to be riding on the batten fixed to the mold stations and frames/bulkheads to  follow the rolling bevel of the laps .
Does this batten have to match the thickness of the planking stock in order to cut the correct bevel on the planking stock ?
No, it is independant of the planking thickness, but the batten needs to be the same thickness as the distance from the bed (or sole) of the plane up to the bottom of the rod (or the hole). So if a tangent to the rod was positioned 12mm above the sole of the plane, you would need to use a 12mm batten, and so on. All that you are doing is ensuring that the sole of the plane is parallel with an imaginary line drawn from the point where the next plank touches the mold (i.e. where the batten is positioned - in fact parallel with the bottom surface of the batten) to the bevelled lap on the plank which is already in position. I think my description is confusing, but the attached sketch may explain.


I hope you don`t mind all the questions No, I dont mind at all, and Im only too happy to help where I can , and I hope they make sense to you Yes they do, and I think they are very sensible questions , as  I would really try my hand at clinker / (  lapstrake? )  boat building , and your method of cutting rolling bevels appears to be the best way to do this. Glued lapstrake is my favourite method of construction for small craft. It is nowhere near as difficult as some people imagine, but it does need the application of some common sense. Please let me know if you want more information. There are several excellent books on the subject,including Iain Oughtreds "Clinker Plywood Boatbuilding Manual" , Tom Hills "Ultalight Boatbuilding" and "How to Build Glued Laptrake Wooden Boats"  by John Brooks and Ruth Anne Hill.
Read More..

Kamis, 31 Maret 2016

Spiling Lapstrake Planks Interesting Shapes

You often hear designers describing the "lay" of planks. What does this mean? Well, depending on the form of a boats hull, and the way in which the planking has been lined-off (another subject in itself), the shape of the individual planks when they are being marked out on the bench can be quite remarkable.

Here is an extreme example - the photo sequence shows the development of the sheer strake (top plank) of one of the Bolger Hope designs which we built. The boat is quite wide for her length, and she has extreme flare in the forward sections. Phil Bolger told me that the lapstrake planking might be a bit difficult up there, and he was correct (as always).
? ?? ? ?
Here you can see the temporary battens I used when carrying out the lining-off process. After establishing what I thought was a fair run of planking, tick marks were transferred to the molds and the battens were removed.
??
Here you can see my son, Dave, marking the shape of the sheer strake onto the plywood planking material. He is tracing around the spiling batten which we had fabricated to lift the plank shape from the boat

This photo shows just how severe the shape of the plank appears when laid out on the flat. But after being bent around the complex shape of the hull, everything looks normal. In the photo, the end closest to the camera is the bow end of the plank.

With the planking complete, you can see that the strange and twisted shape of the plank pattern resulted in a nice, fair plank line on the finished hull.

This picture shows another extreme. These are the topside plank patterns for an Eve 16 - a boat which has very little twist and concavity in here sections. You can see that the plank patterns are all very similar, with subtle shaping. 

This is the planked hull of the Eve 16 - the bottom was laid up with glued-strip planking
Read More..

Sabtu, 20 Februari 2016

More About Fine Lines and Lapstrake Planking

Dennis has written a comment about my last posting which is quite interesting: -

Ross, this is precisely the problem I face in my own region sailing in the Great Lakes USA. The water never gets warm, really, and getting a dousing is not a lot of fun, especially as one ages and gets "thin blood." Your first picture illustrates perfectly the trouble my 15 ft sailboat gives me. And while she sails very well, I increasingly feel the need to replace her with a drier boat.

I figured the problem was that there was not enough flare in the top sides of my boats fwd section. Does flare contribute to a fine entry? The relationship between the two is not clear to me and the picture of Phoenix III seems to challenge that supposition. Can one have a beamier boat than the Phoenix III, say 6 ft, on a 15-15.5 ft length and still attain a fine entry to the bow you mention in your blog?

Best, Dennis


Well, this is a very good selection of questions, and the answer to all is, "Yes and No".

Yes, flare can contribute to a fine entry angle at the waterline and below, but it is only one of the design elements involved. To get a combination of flare, adequate breadth (or beam, as it is commonly called), and fine entry angles, you usually need to have a construction method which allows for compound curves in the structure. I will describe an exception shortly, but compound curves normally eliminate sheet material (for us that means plywood) as a building material.

The forward sections of Phil Bolgers Harbinger design
In the above photo, you can see a hull which is very wide (7 1" on a 15 LOA) and yet has extremely fine entry lines and substantial flare.This boat was designed to be built using bent-frame carvel planking - a system which allows one to build a hull which contains compound curvature. Other options would be strip planking, cold molded using muliple layers of diagonal veneer, or, as I did with this boat, strip/diagonal, which is a combination of stip planking and double diagonal.

There are other options. Take as an example this lobster boat - also a Phil Bolger design, which I built using glued-lapstrake planking.

Planty of flare, but lots of planks

Phil Bolger Hope showing her fine lines

Once again, there is plenty of flare and a fine entry angle - all in a boat which is wide for her length. In this case I was only able to achieve the required shape by using a lot of narrow planks. In therory, if I had used an infinite number of planks, I could have achieved any shape I wanted, but the building process would by infinitely time-consuming and infinitely heavy - so a compromise had to be reached.

When I was designing Phoeinx III and Periwinkle, I was determined to use the minimum number of planks which was consistent with an nice hull shape. This allowed me to capitalise on the wide planks which could be cut from standard sheets of plywood, while at the same time reducing the marking, cutting, and gluing labour time for the builder. Once again a compromise. The individual planks were wide enough to need to be developable shapes, but I still had more latitude with hull shape than would be the case with a sheet plywood boat.

The first Periwinkle awaiting her launching
 One of the design elements which allowed me to get a nice shape with so few planks was that the boats were relatively slender for their length. There are other good examples in the work of Joel White and Iain Oughtred and others.

Periwinkle, showing that she is relatively long and narrow.
There is another option, and that is to take sheet plywood construction to the limits of plywoods ability to twist and bend at the same time. This approach requires very careful design to ensure that all planks (or hull panels in this case) are what is called "developable". What this means is that the hull shape is designed so that the hull panels, which are cut from flat sheets of plywood, steel, or aluminium, are never required to bend in more than one plane at a time.

To visualise this, consider taking a sheet of card, bending it into a section of a cylinder, and then trying to bend it in another plane - it just wont work. If you bend a section of sheet material, it must take up a shape which is a segment of a cone or a cylinder. Therefore, you will always find a place on the curved surface where you will be able to lay a straight edge, and have it contact the surface along its length.

Now, it is possible to draw, using geometry, a surface which is composed of a number of adjacent cones and cylinders, but it is very time-consuming, and the resulting hull shapes are limited. Many thousands of stringer/frame plywood boats have been built this way over the decades, but they are generally fairly blunt and full in their forward sections. The resulting design options are limited.

Here is a good example of a plywood boat with developable panels taking up the normal sort of shape common to this design method. A nice boat, but fairly blunt up forward.
These days, the combination of computer modelling and stitch-and-glue construction has allowed developable shapes to enter new realms of shaping. The computers number-crunching ability has allowed thousands of calculations to be carried out per second, and the stitch-and-glue method of construction has facilitated the un-folding of bottom panels which have been cut from pre-computed shapes and sewn along their edges.

Bottom panels of Flint cut to shape.....
...unfolded.....
...and made into a boat....
...which goes nicely with a beautiful, flared and fine entry - all from sheet plywood.
The final answer to Dennis question is that I think it is possible to design a wide, flared, plywood boat which has fine entry lines - but the main problem is the "wide" bit. Perhaps glued-lapstrake or multi-chine plywood is the best approach. One day soon Ill have a go at a dingy hull of 15.5 x 6 in stitch-and-glue to see what I can achieve - but it will be a while before I get around to it.
Read More..
 
Wooden Boat - Powered By Blogger